-40%
Jayco Jayflight Winnebago Large Graphics Kit RV Camper Trailer Motor Home 28pc.
$ 190.07
- Description
- Size Guide
Description
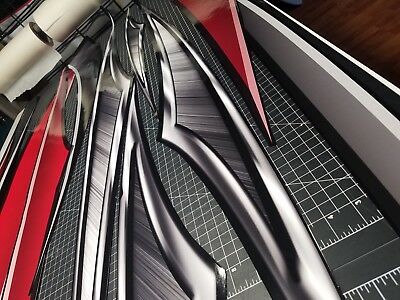
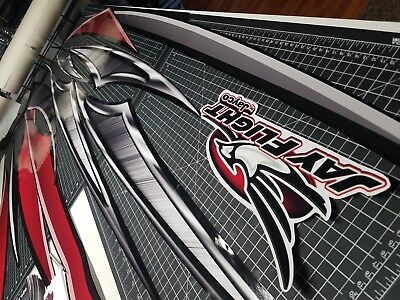
Dress your unit up with these sleek hand-drawn graphics. This kit is fully customized with CHROME - BRUSHED ALUMINUM Streaks for a super edgy, clean & fresh look!3M VINYL DECALS (Laminated)
Laminate Options:
1. Matte Finish
2. Gloss Finish
*Reflective vinyl also available with an upcharge price.
Background fill Options (theme):
Carbon fiber
Engine Turn
Diamond Plate
Honeycomb
Grated Rivet Holes
ANY COLOR AVAILABLE!
DESCRIPTION OF VINYL DECALS
Custom hand drawn brushed aluminum graphic ribbons & swooshes. Super size Graphics Kit for your RV, Camper, Motor Home, Trailer, Boat, etc.
Kit Includes:
This graphics kit includes 32 graphics (14 per side & extra logos for the backside etc. - mirrored images for opposite sides)
Decals will be shipped on backing sheets with transfer tape allowing for easy application.
We print to order for fresh graphics every time.
6 - Gloss Black 36" (X2 - each side)
1 - Gloss Black 84" (X2 - each side)
1 - Gloss Black 50" (X2 - each side)
4 - Red Gradient (X2 - each side)
2 - Brushed Aluminum 60" (X2 - each side)
1 - Brushed Aluminum 72" (X2 - each side)
2 - Gray Gradient Fade 50" (X2 - each side)
1 - Gray Gradient Fade 80" (X2 - each side)
2 - 23" Logo
4 - 12" Logo
Gloss Black, Silver Brushed Aluminum, Red Gradient & Gray Gradient
ORDERING:
Please message us if you would like alternate sizes and colors
MATERIALS NEEDED
Small cutting knife or razor blade
Masking tape
Dry cloth
Plastic Squeegee (included)
Alcohol for prepping surfaces
PREPARE
Wipe the surface where the vinyl is to be applied to remove any contaminates such as silicone, wax, or adhesives. Thoroughly dry the surface area with a lint free dry cloth.
Temperatures of 50º - 90º F
APPLICATION
Unroll graphics to let them relax and flatten out.
Lay your Vinyl Decals on a smooth, hard surface such as a tabletop, wall, or floor. Use a squeegee (application tool) to burnish the transfer tape to the vinyl graphic by rubbing over it with a very hard pressure.
Placement and position - Use your eye to guess placement, get a tape measure to correct yourself if off. Tack the vinyl decal in place on the top corners or center of decal.
Pull the Backing Paper back slowly at a 180-degree angle, using the flat of your hand to push the vinyl down onto the Transfer Tape as you slide the Backing Paper off. Avoid touching the adhesive on the Vinyl Decal if you can. If the decal wants to come with the Backing Paper, simply roll backward a bit and push the decal back down onto the Transfer Tape using the flat edge of your fingers while you pull back.
Once the Backing Paper is removed, slowly roll the Vinyl Decal down on the surface from the hinged edge. Use the Squeegee or the palm of your hand to smooth and secure the decal from the center outward.
Squeegee
Use the squeegee to burnish the Vinyl Decal securely to the surface with the Transfer Tape still in place. Slowly peel back the Transfer Tape form the top down or from the end to center, again at a 180-degree angle, taking care that the Vinyl Decal stays securely on the surface. Air bubbles can be removed with a puncture tool.
SHIPPING
Please allow 5 days processing time. All orders will be shipped USPS priority mail with Tracking
Custom or changes in orders will require 5 days handling time.
